
Removing a hard drive from a desktop computer is a task that many users find intimidating, but it’s an essential skill to have. Whether you’re upgrading to a new hard drive, fixing a problem, or recycling your old computer, knowing how to safely remove the hard disk drive (HDD) is crucial. This guide will walk you through the process of how to remove hardrive from computer, from backing up your data to physically taking out the hard drive, ensuring you do it correctly and safely.
Understanding the Importance of Removing Your Hardrive From A Computer
Understanding why and when and how to remove hardrive from computer is a critical piece of knowledge for any computer owner. The hard drive is the vault of your digital life, storing everything from precious family photos to important personal documents. Removing it is not just about the physical act; it’s about safeguarding your information. Whether you’re upgrading to a larger drive, replacing a failing one, or disposing of an old computer, removing the hard drive is a proactive step towards protecting your data from unauthorized access or loss. Moreover, in the era of data breaches and identity theft, knowing how to remove your hard drive is an essential privacy measure. It ensures that when your computer leaves your possession, your personal data doesn’t fall into the wrong hands.
Preparation: Back Up Your Data
Safety First: Turning Off Your Computer and Preparing Your Workspace Before You Remove Hard Drive
Prioritizing safety is paramount when removing a hardrive from computer. The process begins by ensuring that your computer is completely turned off—not just in sleep or hibernation mode—and disconnected from any power source. This step is crucial to protect both you and the computer’s components from electrical hazards. Next, prepare your workspace by choosing a clean, uncluttered area with sufficient light, which will help you see and organize the screws and cables involved in the process. Ground yourself to prevent static electricity from damaging the computer’s internals; this can be done by touching a grounded metal object before handling internal components. Taking these precautions helps prevent accidents and component damage, setting the stage for a smooth and safe hard drive removal process.
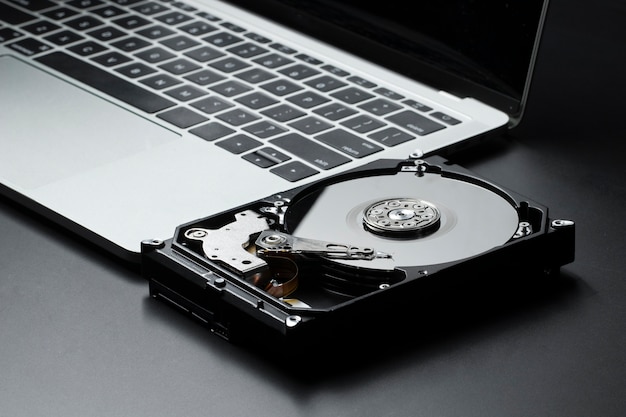
Locating the Hard Drive in Your Desktop or Laptop
Locating the hard drive in your desktop computer is a straightforward process, but it requires a bit of knowledge about the internal layout of your system. Typically, the hard drive is found within the computer case, mounted in a dedicated hard drive bay. This bay is often located near the front of the desktop to allow for easy access and cable management. It’s a different scenario with a laptop, where space is at a premium; the hard drive is usually accessed via a panel on the bottom of the machine. In both cases, the hard drive is connected to the motherboard with a SATA cable and receives power through a separate connector. Identifying the hard drive is the first step in the removal process, whether you’re working with the expansive interior of a desktop or the compact arrangement of a laptop.
Disconnecting the Cables and Mounting Screws
Carefully disconnect all cables attached to the hard drive, including the SATA and power connectors. Use a screwdriver to remove the screws that secure the hard drive to the bay or chassis. Some newer hard drive cases may have a lever or switch that releases the drive without the need for tools.
Removing the Hard Drive from Its Bay
Once the cables and screws are removed, gently slide the hard drive out of its bay. If you encounter resistance, check for any additional screws or mounting hardware. Avoid pulling or pushing hard, as this could damage the drive or the computer.
Need To Remove Your Hard? Handling the Hard Drive After Removal
After removing the hard drive, place it in an anti-static bag for protection. If you’re disposing of the drive, consider using a professional service to ensure the data is completely erased. For installation into another computer, handle the drive carefully to prevent damage.
What to Do with the Old Hard Drive?
Once you’ve successfully removed an old hard drive, you’re left with a decision on how to repurpose or dispose of it. If the drive is still functional, you could convert it into an external storage device with an appropriate enclosure, giving it a new lease on life for backups or extra storage. Alternatively, if you’re concerned about data security or if the drive is no longer reliable, you can choose to destroy the drive physically or use software tools to wipe the data before recycling. Some specialized services can securely erase and recycle the drive for you, ensuring that your data won’t be recovered once it leaves your hands.
Troubleshooting Common Issues When Removing a Hard Drive
If you’re having trouble with the removal process, ensure the computer is powered off and unplugged. If the drive won’t budge, double-check for hidden screws or clips. Remember, if you’re applying excessive force, you’re probably doing it wrong.
Final Thoughts: The Benefits of Learning to Remove a Hard Drive
Removing a hard drive is a valuable skill that can save you time and money. It requires fewer technical skills than you might think and provides a deeper understanding of how your computer works. Plus, it’s the first step towards upgrading your system or safeguarding your data before disposal.
Conclusion – Need To Remove Computer Hard Drive?
In wrapping up, the journey of removing a hard drive from your desktop is more than a mere technical endeavour; it’s a rite of passage for every modern computer user. It’s about taking control of your technology, understanding its inner workings, and making informed decisions about upgrades, security, and recycling. The process demystifies the box that sits at your desk and transforms it from a closed appliance to an open canvas, where you’re the artist capable of upgrading, repairing, and securing. With the cover off and the drive in your hand, you’re no longer just a user; you’ve stepped into the realm of being a custodian of your digital world, empowered with the knowledge that whatever task comes next, you’re fully equipped to handle it with confidence and skill. For the best services at affordable prices, contact us now!